使用Vagrant+Virtualbox搭建跨平台开发环境
这节课说到;
使用Vagrant+Virtualbox搭建跨平台开发环境;
切换环境很方便;
搭建php , python 等开发语言的环境都生成;
废话不多说;
先说两个安装的注意点:
1.在安装之前首先电脑要开启虚拟化();
这里就不多说啦;
没有开启虚拟化;
会出现很多奇怪的问题;
2.建议大家安装我给大家提供的安装包;
vagrant 与 virtualbox 需要版本匹配使用;
强烈建议 (╥╯^╰╥);
vagrant+virtualbox.zip
前人挖坑,后人踩坑;
(╥╯^╰╥);
第一步我们先安装Vagrant;
安装vagrant 下载链接地址:
https://www.vagrantup.com/downloads
下载安装就行;
一顿的傻瓜式操作(下一步);
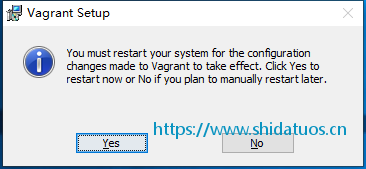
这里安装完成他会谈提示;

这里需要点击 yes;
注意:它会重启电脑;
配置环境变量;
好的我们重启完继续;
哈哈 , 开个玩笑;
重启完成之后;
我们的vagrant 就安装好啦;
第二步我们就要安装Virtualbox;
安装virtualbox 下载地址;
https://www.virtualbox.org/wiki/Downloads
然后我们指定一个目录为开发目录;
我创建了一个 vbox 的目录;
运行vagrnat 命令;
vagrant init
运行成功;
此时文件目录;
就会多出来一个文件;
文件名称为 Vagrantfile;
这是vagrant 配置虚拟机的一个文件;
修改文件内容为:
# -*- mode: ruby -*-
# vi: set ft=ruby :

# All Vagrant configuration is done below. The "2" in Vagrant.configure
# configures the configuration version (we support older styles for
# backwards compatibility). Please don't change it unless you know what
# you're doing.
Vagrant.configure("2") do |config|
  # The most common configuration options are documented and commented below.
  # For a complete reference, please see the online documentation at
  # https://docs.vagrantup.com.

  # Every Vagrant development environment requires a box. You can search for
  # boxes at https://vagrantcloud.com/search.
  config.vm.box = "vbox"
   #这里配置机器启动时的名字
  # Disable automatic box update checking. If you disable this, then
  # boxes will only be checked for updates when the user runs
  # `vagrant box outdated`. This is not recommended.
  # config.vm.box_check_update = false
   #如果这个设置为true那么vagrant将会检查每个box的更新   如果有了更新会提示用户
  # Create a forwarded port mapping which allows access to a specific port
  # within the machine from a port on the host machine. In the example below,
  # accessing "localhost:8080" will access port 80 on the guest machine.
  # NOTE: This will enable public access to the opened port
   config.vm.network "forwarded_port", guest: 80, host: 80
   config.vm.network "forwarded_port", guest: 3306, host: 3306

  # Create a forwarded port mapping which allows access to a specific port
  # within the machine from a port on the host machine and only allow access
  # via 127.0.0.1 to disable public access
  # config.vm.network "forwarded_port", guest: 80, host: 8080, host_ip: "127.0.0.1"

  # Create a private network, which allows host-only access to the machine
  # using a specific IP.
   #config.vm.network "private_network", ip: "192.168.33.10"
   #私有网络
  # Create a public network, which generally matched to bridged network.
  # Bridged networks make the machine appear as another physical device on
  # your network.
  config.vm.network "public_network"
    #公有网络
  # Share an additional folder to the guest VM. The first argument is
  # the path on the host to the actual folder. The second argument is
  # the path on the guest to mount the folder. And the optional third
  # argument is a set of non-required options.
  # config.vm.synced_folder "../data", "/vagrant_data"

  # Provider-specific configuration so you can fine-tune various
  # backing providers for Vagrant. These expose provider-specific options.
  # Example for VirtualBox:
  #
  # config.vm.provider "virtualbox" do |vb|
  #   # Display the VirtualBox GUI when booting the machine
  #   vb.gui = true
  #
  #   # Customize the amount of memory on the VM:
  #   vb.memory = "1024"
  # end
  #
  # View the documentation for the provider you are using for more
  # information on available options.

  # Enable provisioning with a shell script. Additional provisioners such as
  # Puppet, Chef, Ansible, Salt, and Docker are also available. Please see the
  # documentation for more information about their specific syntax and use.
  # config.vm.provision "shell", inline: <<-SHELL
  #   apt-get update
  #   apt-get install -y apache2
  # SHELL
end
然后是添加虚拟机镜像文件;
我这里用的是我比较喜欢用的镜像;
我把链接放在这 ubuntu 的系统;
一个命令就可以安装你所需要的应用;
非常方便;
我的镜像下载地址
当然有的人喜欢用 CentOS;
其他镜像下载地址
下载下来之后;
我们把他放在 vbox 这个目录里面;
开始根据镜像生成虚拟机;
运行;
vagrant box add {box_name} {file_path}如图所示:
提示这个说明你就安装成功啦;
九九八十一难已经走了一大半啦;
这个时候;
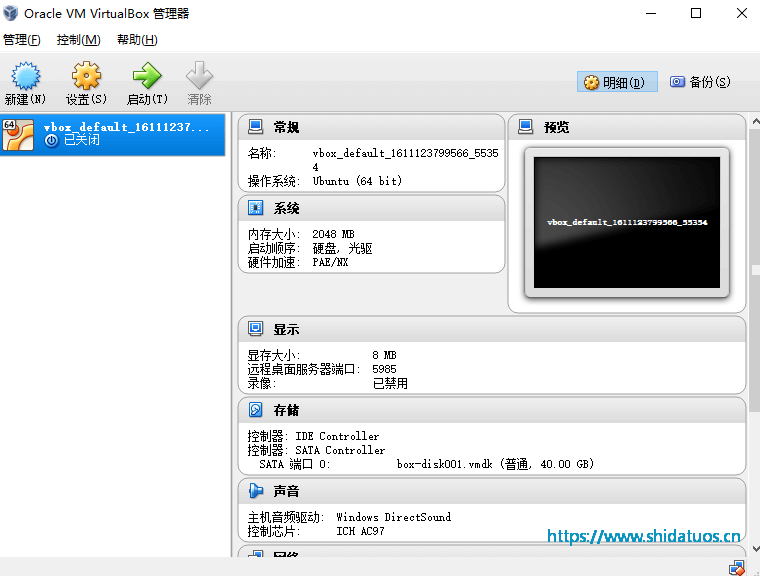
你的 virtualbox 就会出现;
一个虚拟机;
虚拟机的状态是已关闭;

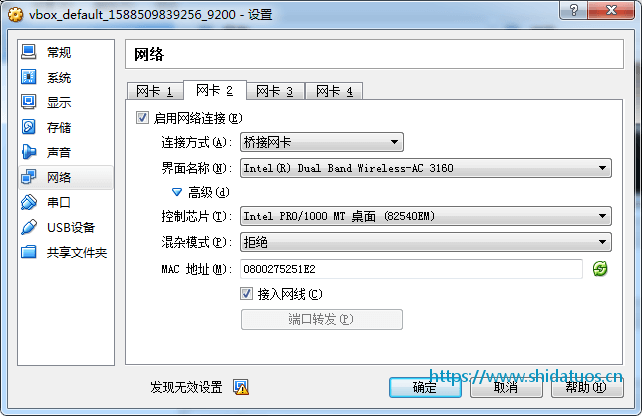
这个时候右键点击->设置->网络
出现下面的页面;
具体我不知道你们的电脑是什么样的;
配置虚拟机网卡;
我的配置如下:


然后点击确定,保存配置;
之后再运行 vagrant up
$ vagrant up
Bringing machine 'default' up with 'virtualbox' provider...
==> default: Clearing any previously set forwarded ports...
==> default: Clearing any previously set network interfaces...
==> default: Preparing network interfaces based on configuration...
    default: Adapter 1: nat
==> default: You are trying to forward to privileged ports (ports <= 1024). Most
==> default: operating systems restrict this to only privileged process (typically
==> default: processes running as an administrative user). This is a warning in case
==> default: the port forwarding doesn't work. If any problems occur, please try a
==> default: port higher than 1024.
==> default: Forwarding ports...
    default: 80 (guest) => 80 (host) (adapter 1)
    default: 3306 (guest) => 3306 (host) (adapter 1)
    default: 22 (guest) => 2222 (host) (adapter 1)
==> default: Booting VM...
==> default: Waiting for machine to boot. This may take a few minutes...
    default: SSH address: 127.0.0.1:2222
    default: SSH username: vagrant
    default: SSH auth method: private key
    default:
    default: Vagrant insecure key detected. Vagrant will automatically replace
    default: this with a newly generated keypair for better security.
    default:
    default: Inserting generated public key within guest...
    default: Removing insecure key from the guest if it's present...
    default: Key inserted! Disconnecting and reconnecting using new SSH key...
==> default: Machine booted and ready!
==> default: Checking for guest additions in VM...
    default: The guest additions on this VM do not match the installed version of
    default: VirtualBox! In most cases this is fine, but in rare cases it can
    default: prevent things such as shared folders from working properly. If you see
    default: shared folder errors, please make sure the guest additions within the
    default: virtual machine match the version of VirtualBox you have installed on
    default: your host and reload your VM.
    default:
    default: Guest Additions Version: 5.1.18
    default: VirtualBox Version: 4.3
==> default: Mounting shared folders...
    default: /vagrant => C:/vbox
出现上面样子;
说明已经安装并且启动成功;
接下来再配置虚拟机的环境;
执行 vagrant ssh 进入到虚拟机;/vagrant/ 就是我们开发的共享目录;
之后就是在这个项目里面开发;
然后我们再配置 nginx;
进入到我们的nginx目录;
/etc/nginx/conf.d创建 y.conf 文件;
文件内容如下;
这是一个配置laravel项目的配置文件;
 server {
    listen       80;
    server_name  y.com;
    #charset utf-8;
    access_log  /var/log/host.access.log;
    error_log   /var/log/error.log;
    # gzip off;
    root        /vagrant/ycloud/public;
    index       index.php index.html index.htm;
    location / {
        if (!-e $request_filename) {
           rewrite  ^/(.*)$  /index.php/$1  last;
           break;
        }
    }
    location ~ .*\.(gif|jpg|jpeg|png|bmp|swf)$ {
        expires 100d;
    }
    location ~ .*\.(js|css)?$ {
        expires 30d;
    }
    error_page   500 502 503 504  /50x.html;
    location = /50x.html {
        root   html;
    }
    location ~ \.php(/|$) {
        #fastcgi_pass   127.0.0.1:9000;
        fastcgi_pass    unix:/run/php/php7.1-fpm.sock;
        fastcgi_index  index.php;
        include        fastcgi.conf;
        set $fastcgi_script_name2 $fastcgi_script_name;
        if ($fastcgi_script_name ~ "^(.+\.php)(/.+)$") {
            set $fastcgi_script_name2 $1;
            set $path_info $2;
        }
        fastcgi_param   PATH_INFO $path_info;
        fastcgi_param   SCRIPT_FILENAME   $document_root$fastcgi_script_name2;
        fastcgi_param   SCRIPT_NAME   $fastcgi_script_name2;
    }
}
保存退出;
sudo nginx -s reload重启nginx ;
再修改本地的host文件;
这里就不多说啦;
映射到本地的虚拟域名;

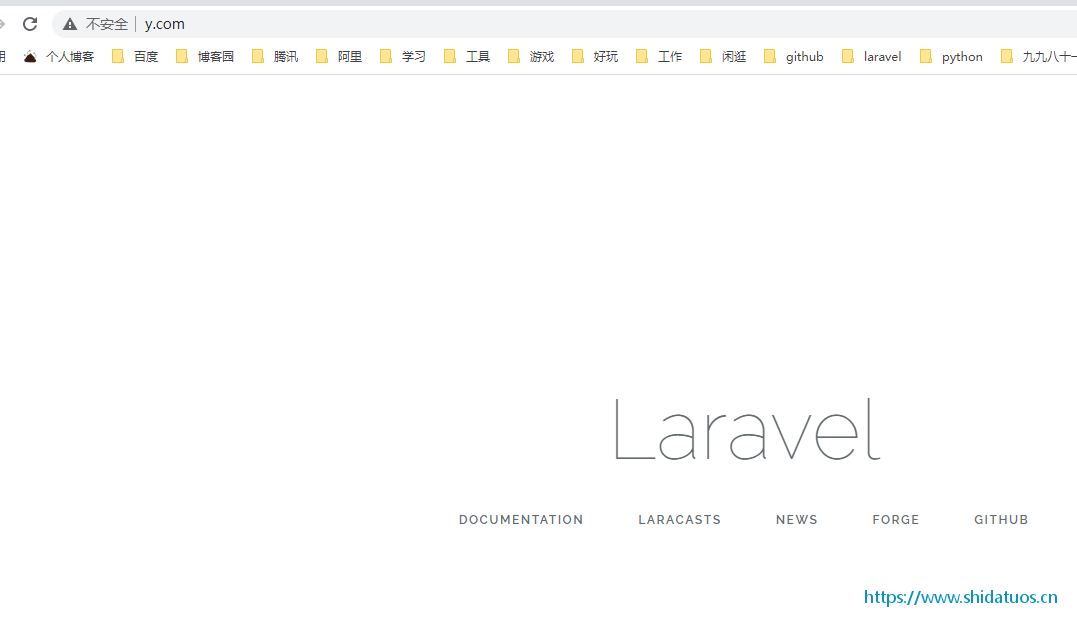
ok , 请求出来啦;
nice , (╥╯^╰╥);
总结一下:
vagrant 几个常用的命令;
vagrant box add {box-name} {box-url}  //添加Box镜像
vagrant init                          //创建一个vagrant环境
vagrant up                            //启动vagrant
vagrant ssh                           //连接vagrant
vagrant halt                          //关闭虚拟机
vagrant reload                        //重启虚拟机
vagrant box remove {box-name} //删除box镜像本文为史大坨原创文章,转载无需和我联系,但请注明来自史大坨博客https://www.shidatuos.cn

- 最新评论
- 总共0条评论


